
In this article, I will dive straight into the practical aspects of Kubernetes, assuming you already have a general understanding of this container orchestration system. I will focus on creating and managing pods, using ConfigMaps and Secrets for efficient configuration, and how to expose your applications using Services. The goal is to provide you with practical knowledge that you can immediately apply to your Kubernetes projects.
Creating and Managing Pods
In this section, I will explore how to create and manage a Kubernetes pod using Nginx (a web server) as an example.
Creating an Nginx Pod
To create a pod running Nginx, I will write a deployment YAML file as follows:
This YAML file defines a Kubernetes deployment named nginx-deployment, which manages three replicas of Nginx pods. Each pod contains a container using the nginx:latest image and exposes port 80.
Now that I’ve written the deployment file, to create the pod in your cluster, save the file as nginx-pod.yml and run the following command:
kubectl apply -f nginx-pod.ymlManaging Pods
List all Pods:
kubectl get podsThe result of the kubectl get pods command should look like this:
Explanation:
- NAME: The name of the pod. Pod names are automatically generated and include the deployment name followed by a unique identifier.
- READY: Indicates how many containers in the pod are ready. In this example, each pod has one container (1/1).
- STATUS: The current status of the pod (Running, Pending, Succeeded, Failed, Unknown).
- RESTARTS: The number of times the container has restarted.
- AGE: The time elapsed since the pod was created.
View details of a specific pod:
kubectl describe pod <pod-name> [options]Delete a Pod:
kubectl delete pod <pod-name> [options]View the logs of a Pod:
kubectl logs <pod-name> [options]Execute a command in a Pod (for example, ls / to list the directories at the root) :
kubectl exec <pod-name> -- ls /Using ConfigMaps and Secrets
Introduction to ConfigMaps
Definition
ConfigMaps are Kubernetes objects that allow you to store and manage non-sensitive data, such as configuration files, environment variables, and property files. They provide a way to separate configuration data from container images, making applications easily portable.
Usage
ConfigMaps are used to pass configurations to containers at runtime, allowing applications to remain independent of their environment. They are especially useful in scenarios where multiple environments (development, testing, production) require different configurations.
Example Usage
Creating a ConfigMap containing configuration information
Using this ConfigMap in a deployment to define environment variables:
Introduction to Secrets
Definition
Secrets are Kubernetes objects designed to store and manage sensitive information, such as passwords, OAuth tokens, and SSH keys. They are similar to ConfigMaps but are specifically designed to hold confidential data.
Usage
Secrets allow you to securely store and manage sensitive information, avoiding the need to include it directly in container images or script files. Access to Secrets can be controlled and limited within the Kubernetes cluster.
Example Usage
Creating a Secret containing user credentials:
Mounting the Secret in a deployment as environment variables:
Using Services
Definition and Purpose of Kubernetes (K8s) Services
Services in Kubernetes (K8s) are abstractions that define a logical set of pods and a policy for accessing those pods. They simplify internal and external communication, allowing applications to receive traffic without needing to be concerned about the underlying infrastructure.
Example of Internal Access Usage with Nginx
Let’s say you have an Nginx pod deployed on Kubernetes and you want to enable another internal application to access this web server.
Deployment of Nginx
Service Nginx for Internal Access
This service allows other applications within the same Kubernetes cluster to access Nginx using the service name nginx-service.
Example of Usage for External Access with Nginx
To expose Nginx outside of the Kubernetes cluster, you can use a LoadBalancer type Service.
Service Nginx for External Access
This LoadBalancer type service exposes Nginx on the internet, allowing users to access your web server using the external IP address assigned to the service by the cloud provider.
To retrieve the external IP address assigned to the “nginx-external-service” service, execute the following command:
kubectl get svc nginx-external-service -o=jsonpath='{.status.loadBalancer.ingress[0].ip}'This command retrieves the external IP address assigned to the nginx-external-service. It uses the -o=jsonpath option to filter the output and display only the external IP address.
To retrieve all details of the service, including its external IP address, you can use the following command:
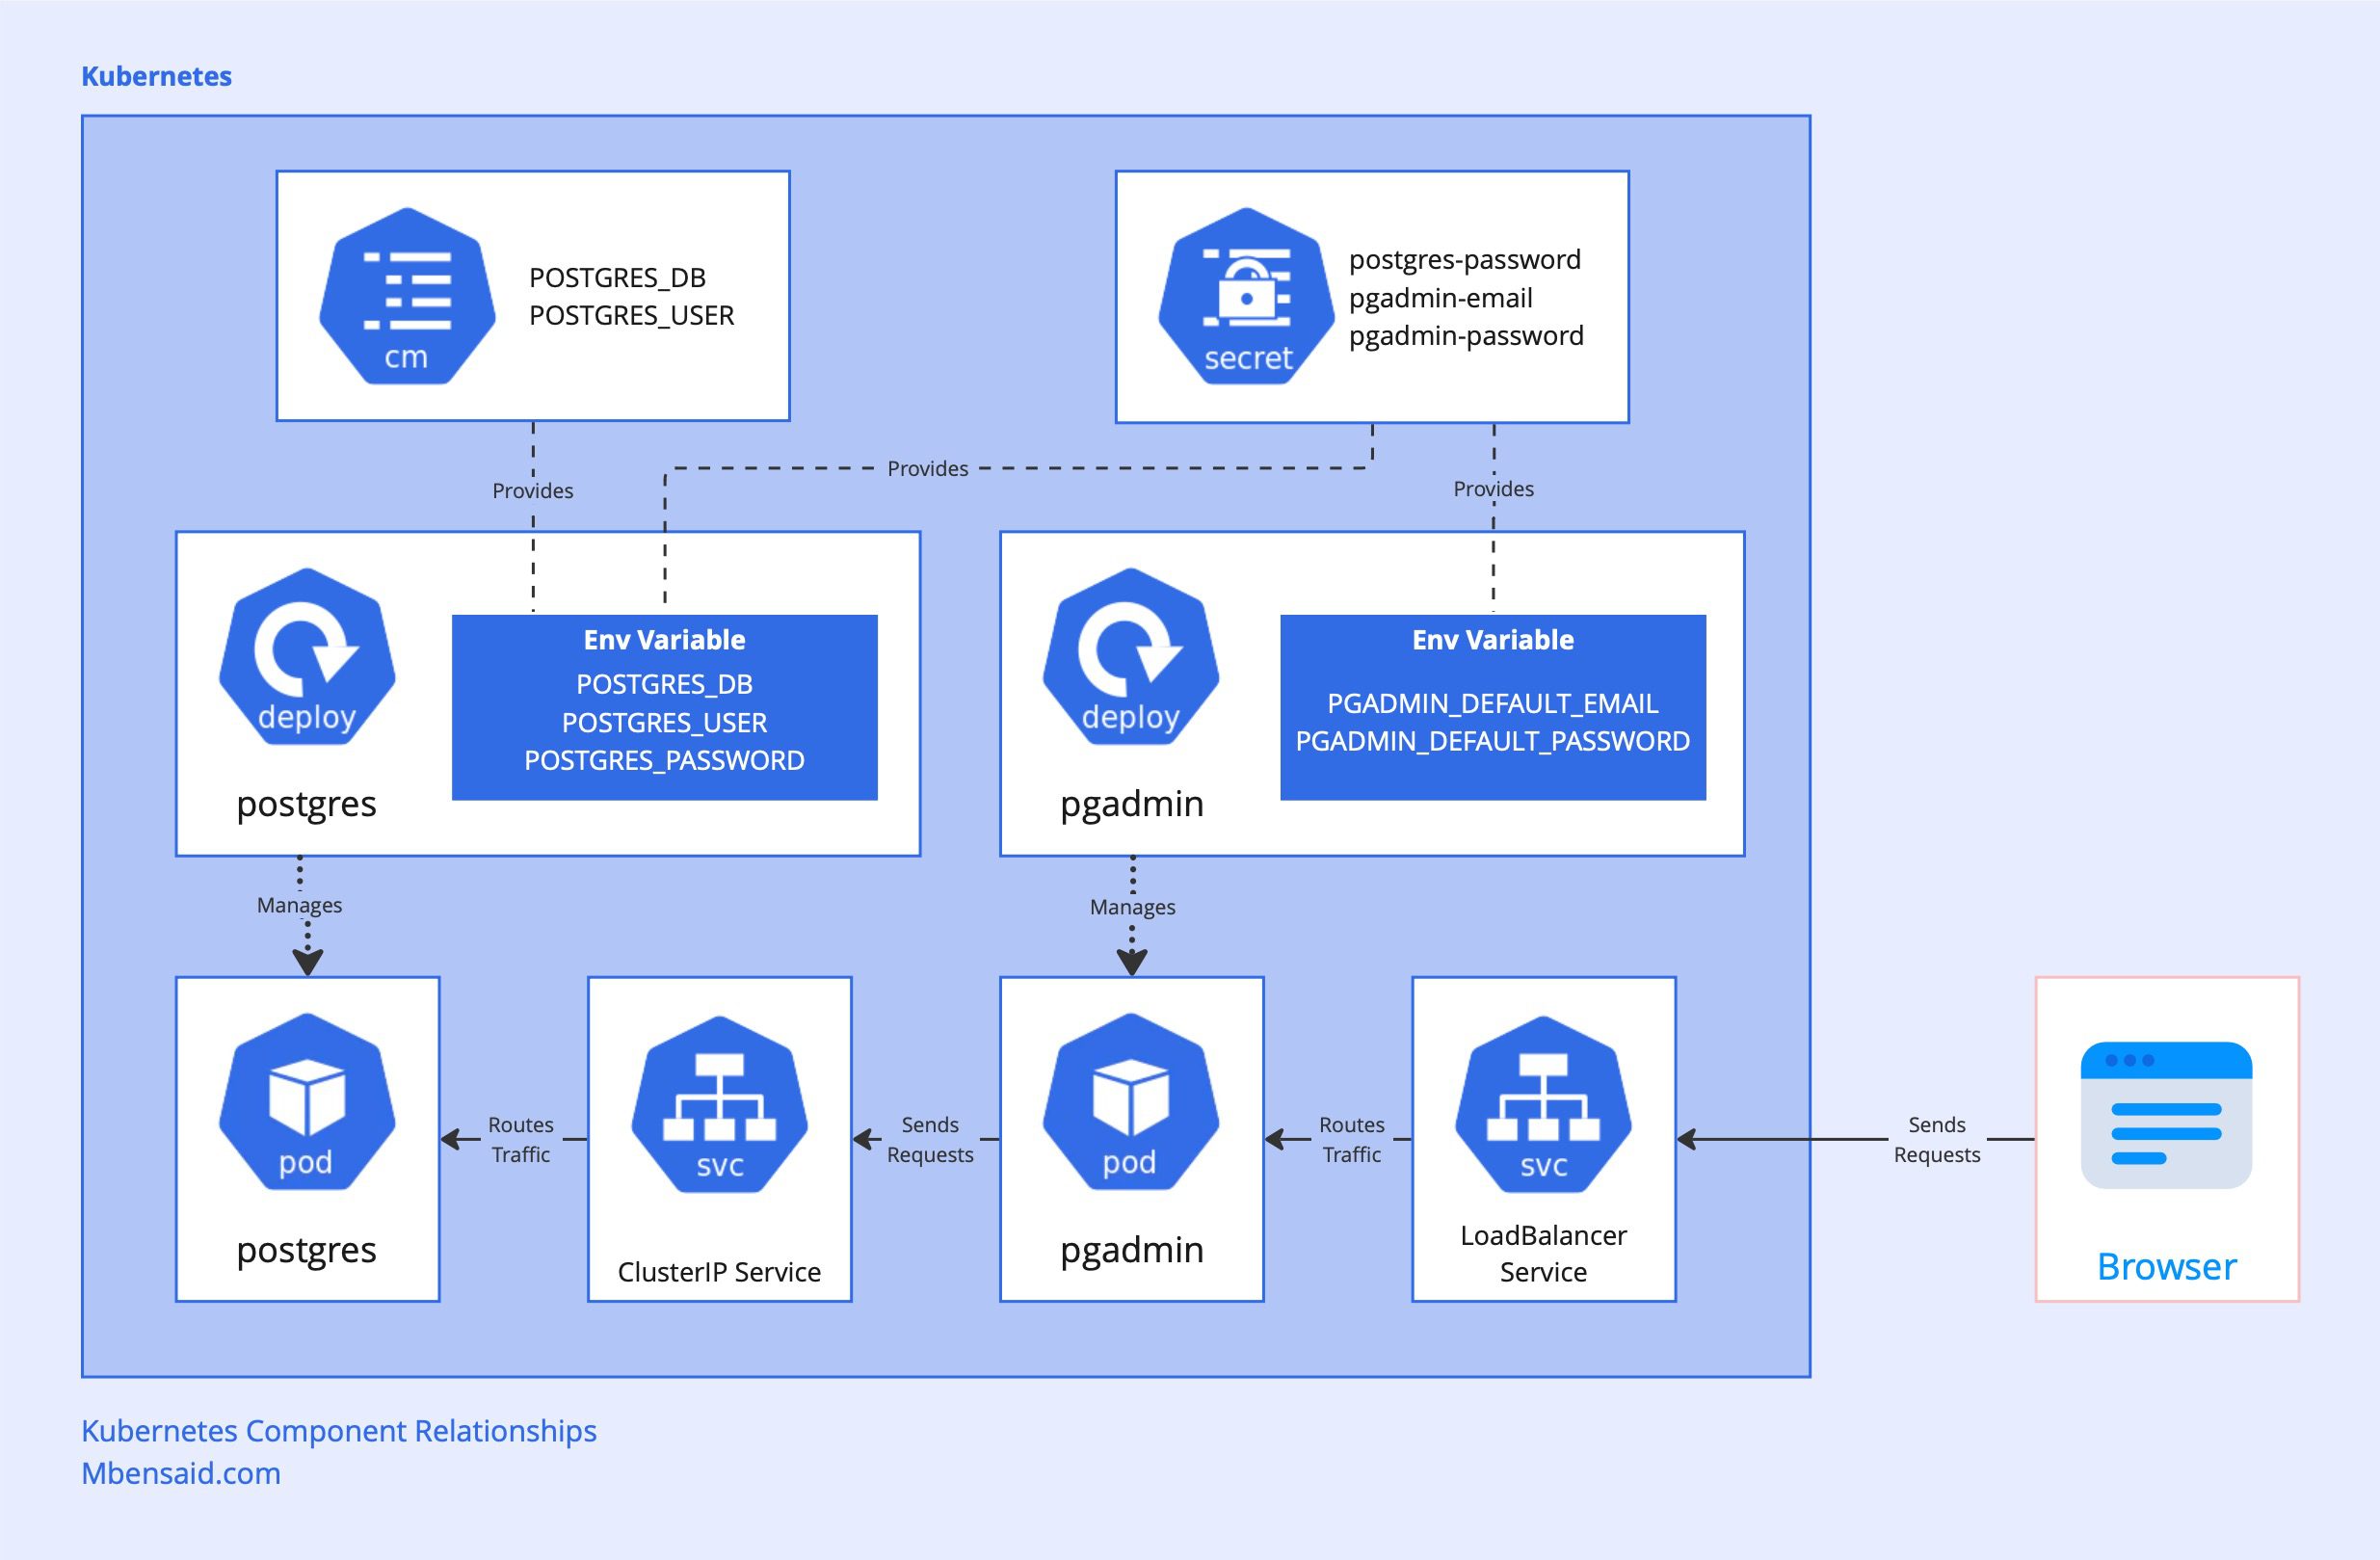
kubectl get svc nginx-external-service -o wideComplete Deployment of PostgreSQL and pgAdmin4 on K8s
In this section, I will present a complete example of deploying PostgreSQL and pgAdmin4 on Kubernetes. This example will integrate all the concepts we have discussed previously: deployments, internal and external services, ConfigMaps, and Secrets.
Preparing Configuration Files
Create a Secret for passwords
Create a secret.yaml file to securely store the passwords for PostgreSQL and pgAdmin4
Create a ConfigMap for PostgreSQL configurations
Create a configmap.yaml file to store PostgreSQL configurations
Deployment of PostgreSQL
Create a postgres-deployment.yaml file to deploy PostgreSQL
Internal Service for PostgreSQL
Create a postgres-service.yaml file to expose PostgreSQL within the cluster
Deployment of pgAdmin4
Create a pgadmin-deployment.yaml file to deploy pgAdmin4
External Service for pgAdmin4
Create a pgadmin-service.yaml file to expose pgAdmin4 outside of the cluster.
To access PgAdmin in Minikube, it’s usually easier to use a NodePort service or run the minikube service command to open it in your browser. The LoadBalancer option often doesn’t work well in local setups like Minikube since it’s mainly designed for cloud environments.
For local environment we will use NodePort
For cloud environment we will use LoadBalancer
Applying Configuration Files
To deploy PostgreSQL and pgAdmin4, use the configuration files by running the following commands in your terminal (VS Code <3 )
Accessing pgAdmin4
For NodePort
Once the service is set up, you can use the minikube service command to open PgAdmin in your browser
minikube service pgadminFor LoadBalancer
Once the services are deployed, you can access pgAdmin4 using the external IP address provided by the LoadBalancer service. You can find this IP address with the following command
kubectl get svc pgadminYou should see output similar to this:
Use the displayed IP address and port to access the pgAdmin4 interface via your web browser. Log in with the credentials specified in the Secret.
Conclusion
If you’ve made it to the end of this article and have tried out the various steps yourself, congratulations! I hope you’ve gained a good understanding of the concepts covered. You don’t need to memorize the commands or the contents of deployment files, but it’s important to understand the different components of Kubernetes that we’ve explored, as well as their relationships and use cases.
In an upcoming article, I’ll delve into Helm, which will greatly simplify and automate the management of your Kubernetes applications.
Resources
For the curious, here are some resources used in writing this article:
Service: https://kubernetes.io/docs/concepts/services-networking/service
ConfigMaps: https://kubernetes.io/docs/concepts/configuration/configmap
Secret: https://kubernetes.io/docs/concepts/configuration/secret
Deployment: https://kubernetes.io/docs/concepts/workloads/controllers/deployment/
Note: In this post, I used Grammarly’s AI tool for grammar and language correction.